Tuesday, November 24, 2015

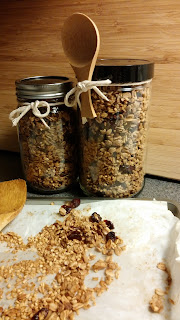
Cranberry & Nut Granola Gift Idea


3 cups organic rolled oats
1 cup organic oat groats
1/2 cup coconut sugar
1/4 cup ground flaxseeds
2 tbsp maple syrup
1 cup dried cranberries
1/2 virgin coconut oil
1 cup chopped walnuts and pecans
1/2 fresh orange juice


Using a coffee grinder, grind flaxseed into a powder. Mix flaxseed and orange juice in a separate bowl. In another larger bowl, mix rolled oats, oat grouts, flaxseed mixture, coconut oil, coconut sugar walnuts & pecans, maple syrup, and cranberries, Add Mix well. Pour mixture evenly  onto a cookie sheet,line with parchment paper then place in a 350 degrees oven. Bake until crispy for 15 minutes.

Saturday, November 21, 2015

Baked Nofish!


1.lb dried yuba sticks, aka dried bean curd
2 cups vegan homemade vegan seafood stock  <---- click here for recipe
1/4 cup finely crushed dried seaweed
2 tbsp arrowroot
1 tbsp sesame seed oil
4 to 5 nori sheets
1/2 to 3/4 cup homemade seafood stock
1/3 cup liquid amino all purpose seasoning sauce
1/3 cup sweet japanese mirin
1/3 cup vegan seafood stock
2 tbsp sugar
toasted sesame seeds

1) Dried yuba sticks are long, you will have to break them up into 1/2 inch pieces. Use a deep dish and pour enough vegan seafood stock to cover the yuba sticks, cover with saran wrap. make sure the stock is warm enough to soften the yuba sticks. I let mines marinate over night so it could a more fish like taste. 

2) The next day drain the yuba sticks and squeeze the rest of the liquid out. If the yuba sticks are still hard, boil them in some water until they are soft. Let them cool before placing them into a food processor. Chop them up until they reassemble flaky tuna. Transfer the flaky yuba in a bowl and add the crushed seaweed. I used a coffee grinder to crush the seaweed into very fine pieces. They should look like coffee grounds. Add enough homemade seafood stock to bind the mixture together. Set aside.

3) BINDING MIXTURE: In another small dish mix 1 tbsp of arrowroot and 2 tbsp of water, set aside.

4) Making the Vegan baked fish:
I used a wooden board for my work station. Working with 1 piece of nori at a time to make a vegan fish. Lay 1 piece  nori,  use your hand and dip it  into the binding mixture, spread it on the inside of the nori sheet to moisten it, then add the vegan fish mixture, about 1 inch thick. Fold the nori sheet into 2x2 square pieces. I got about 4 to 5 pieces, Once you are finished making the vegan fish, wrapped them in saran wrap and place them into the freezer over night.

5) The next day, thaw the vegan fish. In a 9x8 tin pan, lined with parchment paper. Add enough olive oil to cover the bottom of pan. Season your vegan fish to your liking and sprinkle with sesame seeds. (warning - do not add salt) Bake at 425 oven for 20 minutes, Turn the vegan fish over and bake the other side until crispy.

Sauce:
1/3 cup liquid amino all purpose seasoning sauce
1/3 cup sweet japanese mirin
1/3 cup vegan seafood stock
2 tbsp sugar

Add all ingredients to a pot and bring it to a boil, them simmer for 3 minutes.

Final step.. 
Pour the sauce over the vegan fish and bake it for about 10 to 15 minutes more. The sauce will become thick.

Serve over white rice.
I know this is a long process but if you miss eating fish like I do, it's all worth the fess because I haven't had fish in over 5 years and this recipe that I found years ago taste just like the real deal!

I modified it by baking the vegan fish instead of frying it and creating my own seafood stock.

Enjoy! 


Chinese Brown Sauce


4 dried shiitake mushrooms
4 cups of water
1/4 cup brown miso
3 clove garlic crushed
1 tsp arrowroot

Marinate the 1st 4 ingredients in a glass bowl over night. The next day pour the ingredients into a pot and heat until it starts to boil. In a small jar add 1/4 cup of water and 1 1/2 tsp of arrowroot, shake and set aside. Remove the mushrooms and pour the arrowroot mixture into the pot. Let it come to a boil, stirring continuously until the sauce thickens. It should be a light gravy consistency.

Friday, November 20, 2015

Noeggnog Ice Cream


2 quart ice cream maker
1 1/4 cup silk heavy cream
1 1/2 cup soy milk
1/2 pure can sugar
1 tsp organic ground nutmeg
1 tsp organic cinnamon
1 tsp organic vanilla extract
pinch of turmeric for that eggnog color
pecan nuts

Place all ingredients into a blender. Pour mixture into a glass bowl and place into the refrigerator for two hours or overnight like I did. Follow the directions to your ice cream maker. Scoop some ice cream into a dish and top it with pecan nuts and a little more nutmeg.

Notes: Note: After freezing ice cream, it will be a little difficult to scoop. Let ice ice cream sit in room temperature for about 5 to ten minutes before scooping. For a creamier texture let the ice cream sit in a bowl in room temperature for about 4 minute or until you notice it's getting soft, then stir for a creamier version of ice cream. Next time I make this ice cream I will add a little tumeric to the mixture while it's in the blender to give it that color I remember when I use to eat eggnog.
This is the ice cream maker I use

Thursday, November 19, 2015

MyGrocery Haul from Thrive Market

Thrive new members  click here
I enjoy grocery shopping online verses going to the supermarket and standing in long lines where’s there’s only a few people checking out groceries. I never understood why there are so many check out stands with nobody working at them when there's so many people waiting to get checked out.

During my extensive research shopping for vegan groceries online that has a delivery service, I found a company website called Thrive Market. They have a large selection of vegan Their prices are a lot more reasonable compare to what I paid at my local health food store and the big chain grocery stores in my area.

I thought I’d share my review of the service I received from Thrive Market with you. That way you can see if Thrive  is something you might want to try. Yes, there is a yearly membership fee but hey, what comes free nowadays? Thrive yearly membership is $59.95 and if your order is over $49.00 shipping is free.

The pros: about shopping online at Thrive  is that, I can help out a family because with my
membership, Thrive will sponsor a low-income family. Plus the fact I can shop right from my computer to search for my favorite organic vegan items on sale! Most of the products I shopped for were 20 to 40% discount compared to where I’d normally shop. I was able to track my package up to the delivery time. The free gifts I got with my order was a plus!

The Cons: The only one or two I can think of was the late delivery, no explanation but I did get an email stating there was a delay the following day. I placed my order on 11/12/15 and received my order today 11/19/15. It was worth the wait! I'm very pleased with my order everything was neatly wrapped and packed. I felt like I was receiving gifts! The second would be no manufacturer discount coupons. It would be nice if they were setup to except discount product coupons.

Also if you don’t want to become a member after your first order, you can cancel at anytime before your 30 day free trail offer.

 Thrive new members  Click Here to become a member and shop for vegan food


I almost forgot to tell you about the nice size Thrive Wholesale Product Magazine they added to my order. I'm looking forward to making some of the vegan recipes that was included in the magazine. Here a little glimpse of the photos I took from the magazine to show you below.


If you place an order with Thrive come back here and share your photo's and shopping experiences with them :)

My second order 1/07/16


Collard Green and Beans Oh My!


Ingredients
1 sweet onion
5 glove garlic, minced
1 lb. bag glory collard greens
2 ribs celery, chopped
2 lg carrots sliced
vegan stock
2 cups cooked, white navy beans
1 tsp thyme
1 1/2 tsp oregano
1/4 smoke paprika
 1/4 pepper flakes                                             
salt to your taste
vegan parmesan to taste
                                                                                                                           
1st I rinsed and soak the beans over night. The next day I cooked them in my Click here to get the Instant Pot.

Next rinse and chopped the collards greens  for a more tender greens, set aside. in my instant pot, I fried the onion and garlic until brown, then I added the greens and fried them for about 3 minutes.  I added enough vegan veggie stock to cover the greens and high pressured cooked them for 7 minutes. After the green were done or the pressure cooker was on warm, I turn it off to a 10 minute natural release. When instant pot was ready to open I added the beans and if the liquid was low I added enough stock to cover the collard greens and beans and carrots. Simmer  for 35 minutes more in the instant pot. I like a lot of veggie stock so I can dunk my biscuits or cracker in my bowl of soup. Don't forget to sprinkle some vegan parmesan on top of your soup. Enjoy it, I know we did!


Sunday, November 15, 2015

No Seaweed Stock


1 cup of dried cut up seaweed
4 cups of water
4 clove crushed garlic
1 tbsp miso
1/4 cup of homemade chinese sauce

Add 4 cups of water, seaweed in a pot of boiling water. Reduce heat to a simmer for 15 minutes. Pour just the liquid into a glass bowl and add the crushed garlic, miso, and chinese sauce. Mix, then add back to the pot and simmer for 1/2 hr more. The stock will be reduced. I use this stock for my potato corn chowder, vegan tofu and vegan stews.